The wireless channel determines the frequency on which your router operates. For Improving a wireless connection strength or signal, you need to set your wireless router to a proper channel. Sometimes using the same wireless channel as your neighbors can slow your wireless connection or cause it to drop. To fix this problem, you can change the channel number of your router. Follow the given steps to change the channel settings.
If you want to block unwanted website on your router then follow this article -Netgear Router - How to Block Unwanted Websites
Step1: Open your web browser, type 192.168.0.1 in the address bar and press Enter.
 Step2: In the login box, enter the username and password for your wireless router.
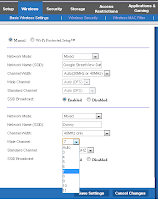
Step3: Select Wireless Settings from the menu. And go to the Channel drop-down menu and select a number that you want your wireless connection to operate on. You can also select Auto mode for automatic selection.
Step4: After completing the all above steps, click “Save Settings”.
Step5: Turn off your router and back on again to check signal strength.
Note: Wireless setting options may vary depending on different wireless router models.
See also: How to Access Wireless Router Settings
Most common router problems & their solutions
If you want to block unwanted website on your router then follow this article -Netgear Router - How to Block Unwanted Websites
Step1: Open your web browser, type 192.168.0.1 in the address bar and press Enter.
 Step2: In the login box, enter the username and password for your wireless router.
Step3: Select Wireless Settings from the menu. And go to the Channel drop-down menu and select a number that you want your wireless connection to operate on. You can also select Auto mode for automatic selection.
Step4: After completing the all above steps, click “Save Settings”.
Step5: Turn off your router and back on again to check signal strength.
Note: Wireless setting options may vary depending on different wireless router models.
See also: How to Access Wireless Router Settings
Most common router problems & their solutions
No comments:
Post a Comment