Monday, January 30, 2012

How to Password Protect a Wireless Network?

In this article we will discuss, how to protect password for wireless network.
Password protection in wireless network is relatively easy task rather than wired network. At the time of setting up wireless network, you should make the network password protect. Given following steps can help you to set password.
If you want to upgrade your netgear router support.then follow the How to Upgrade a Netgear Router  which i have discussed in this blog.

  • Open your  web browser (Like Internet explorer, Mozilla Firefox etc) and on the address bar type ‘192.168.1.1’ and then press the Enter button.
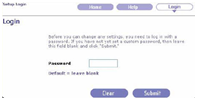
  • Now enter your Username and Password. The default username and password are ‘admin’. However in some cases the password field is left blank and the Username remains ‘admin’. In this case if it does not work, you can log on to the website www.routerpasswords.com to find the default usernames and passwords for the particular router.
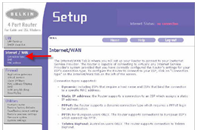
  • Once the right Username and Password are submitted, it will take you to the administration panel. Here you have to select Wireless’ and then choose ‘Basic wireless settings’.
  • You may find the wireless setting for ‘Wireless Network Name’ or SSID. Enter your own username in that field which you want.
  • Click on ‘Save changes’ after that.
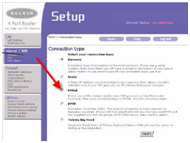
  • Then you have to set up the password for the wireless network. And for this, you have to go to Wireless Security setting’ and choose the security mode from the drop down menu.
  • Enter your password in the WPA shared key field.
  • After completing all above steps then  need to save the settings.

The above instructions are followed step by step, your Wireless network is secured and others can’t access it without your permission.  However, if you find difficulties to perform the task, consult an expert for solve the problem and reach online technical support service desk of V tech-squad at their Toll Free No +1-877-452-9201.


Wednesday, December 14, 2011

How to Disable WPS on Your Belkin Router

The article describes the procedure of disabling WPS (Wi-Fi Protected Setup) on a Belkin router. WPS is a feature that simplifies the setup and management of wireless networks. Since some of the old operating systems or computers may not support the WPS feature, only disabling it leaves one with the option.
The methods compiled here are simple and correct until date. However, it is still advised that these should be followed carefully to avoid bumping into problems. It will save your time and money that would indeed be wasted looking for Belkin router support or Belkin support options.

Instructions:

Before beginning, make sure that you have a wired connection through the Ethernet cable to your computer. A wired connection is required to access your router’s configuration page through the IP address. Besides, grab your login details like username & password to login into the router. 

Open your internet browser and type ‘192.168.2.1’ (without quotes and as is) in its address bar. Hit the Enter key on the keyboard to proceed. You will see the Router Setup Utility login page. Click on the Login button on the extreme top right hand corner. 

When prompted, enter the admin password and then hit the Submit button. If you never set up a custom password for your router, then leave the box blank and simply hit Submit. It is because most of the Belkin wireless routers are shipped without any password. Thus, the field is generally left blank until a new password has already been set up. 

When logged in to the router, click on the Wireless link, the heading in the left hand pane. It will display different sort of information like Language, Version Info, and Internet Settings etc. in the right hand pane. 

Click on the Wi-Fi Protected Setup link under Wireless and you will see the already selected frequency of your wireless connection like 2.4 or 5G etc. Click on the dropdown menu next to the Wi-Fi Protected Setup (WPS) option and select Disabled.

Click on the Apply Changes button to save the changes to the router. Exit the router’s interface if you aren’t making further changes to the settings. You can also verify the WPS disabling with its light. The light over the WPS button but under the Router Status Light must go off after the setting has been done.

Thursday, November 17, 2011

How to Troubleshoot Hooking Netgear Wireless Modem to PC

Call 1-877-242-9701 (24x7) for Netgear Router Support


In this post I have tried to explains how to troubleshoot a Netgear wireless modem hooked to a PC upon experiencing problems. The methods compiled here are simple and correct until date. It is, however, suggested that these should be followed carefully to avoid running into problems or you can also contact Netgear router support at their Toll Free No +1-877-242-9701

Instructions:

Reboot all the devices viz. computer, router, and modem by turning them off and on. A simple reboot has observed to be the easiest and most effective method of making things work until these have gone wrong. Once the devices have booted up, recheck if you get you Netgear device to connect and browse the internet. 

Alternatively, you can power cycle the devices by unplugging their power cords for 10-20 seconds. Plug the power cords firmly back in after the specified time and wait for them to turn on. This should resolve any common issue that might have occurred due to sudden power outage that distorts the memory. 

If the issue persists, then download latest software updates from the official website of Netgear. Browse to the product section, locate the model or version of your Netgear device, and download and install all the available updates. This will help improve the functionality and performance of your Netgear modem. 

If the problem has lasted, then try this method. Click on the Start button and navigate to Run. Type ‘cmd’ (without quotes and as is) in the blank field and hit Enter on the keyboard. When the Command Prompt window comes, type ‘ping 192.168.0.1’ (without quotes) and then press the Enter key. Test ‘ping 192.168.1.1’ also to check if computer is making connection to the router.

Look carefully through the prompts that appear afterwards. If you see a prompt like Request timed out, it indicates that the modem has not been setup correctly. Enter the correct username and password to connect to the internet. If you are not sure or have forgotten this information, check with your ISP (internet service provider). 

The error message may also occur due to enabled proxies in Internet Explorer browser. To do so, open the browser and navigate to Tools and then Internet Options. Highlight the Connections tab and then press the LAN Settings button. Remove checkmark from the box beside Use a proxy server for your LAN. Click on the OK button exit the LAN Settings dialog box. Click on the Apply button and then OK to exit the Internet Options window. Clear the browsing history including cookies etc. and then reconnect to the internet. It should work find now.

If nothing so far has worked out, then hard reset the Netgear router-com-modem. To do so, take a thinner, sharper object and push it inside the Reset hole, located at the back of the router. Hold the button for 10-20 seconds or until you see the blinking power LED light and then release it. This will restore the router’s settings to factory defaults. You can use the default username and password that originally came with the router to login and reconfigure it.

How to Upgrade a Netgear Router

A Wireless router is a device that performs the functions of a wireless access point and a network switch joining your computer and your high-speed modem and as a wireless access point that allows your wireless devices, such as a laptop.  They are commonly uses to allow access to the Internet or a computer network without the need for a cabled connection. You should periodically check for an upgrade to your Netgear router. Upgrading your router can add new features that improve the security and performance of the device as well as addressing any problems not originally detected during manufacturing. Netgear allows you to check for an upgrade from within the SmartWizard interface. You can access the SmartWizard using your web browser. The methods described here are simple and correct to the date. It is, however, recommended that these should be followed carefully to avoid encountering problems. You can also contact Netgear router Support at their Toll Free 1-877-242-9701 for help and support.

Steps to Upgrade Netgear router

•    Open your web browser and type "routerlogin.net" in the address bar and press "Enter."

•    Type the user name and password for the Netgear router into the login dialog. The default user name for your Netgear router is "admin" and "password" is the default password. Click the "OK".

•    Locate the "Maintenance" area on the left side, and click the "Router Upgrade" link.

•    Click the "Check" button. This automatically connects you to the Netgear support servers and checks to see if a newer version of the router software is available. If an upgrade is available, you are asked to download the file onto your computer. By default, the file is saved in the "Downloads" folder.

•    Minimize the Netgear SmartWizard page, and navigate to the downloaded file. Right-click the file and click "Extract here."

•    Maximize the Netgear SmartWizard page, and click the "Browse..." button. This opens a "Choose File to Upload" window on the screen. Browse to the extracted file, and click the "Open" button. This takes you back to the "Router Upgrade" screen on the Netgear SmartWizard.

•    Click the "Upload" button. This initiates the automated upgrade process. Your router will restart once this process has completed.

Monday, September 12, 2011

Step by Step Instructions for PPPOE Configuration on a Belkin Router

A Belkin router can be configured to use the PPPoE connection with the DSL modem. Not all but some ISPs (internet service providers) require their DSL customers to go online using PPPoE. The below mentioned guide will help you configure the PPPoE connection on your Belkin router. It is however recommended that users follow the instructions carefully to avoid facing problems and eventually contacting Belkin technical support to fix them.
Instructions:
Make your computer a wired connection if it is a wireless one. Connect an Ethernet cable to the computer and run its other end into the one of the 4 LAN ports of the router.
Step1:When done, go online (connect to the internet).
Open Internet explorer or Firefox etc., Type ‘192.168.2.1’ and
then press Enter key.When prompted for a username and password,
enter it in the box and click on the Submit button and then on the Login button. It will also be indicated on the screen 
setup pageDefault = leave blank. Simply click on the Submit button and then Login to continue to the Setup screen.

Step2:When the Belkin Setup screen appears, click on Connection 
Type under the Internet / WAN heading on the left hand side pane.
Browse to the PPPoE option, click to select it and then hit the Next button.


setup2 page Step3:In the PPPoE screen, fill in all the information correctly like username and password etc. Confirm the password by retyping it in the Retype Password box. The box next to MTU should be left as default. The last option saying Disconnect after minutes of the activity should
 be left unselected in most of the cases.

 Review your settings. Recheck that you have entered all the information correctly. When done, click on the Apply Changes button to close the PPPoE screen. Exit out the router Setup screen.

Popular Posts