The article describes the procedure of disabling WPS (Wi-Fi Protected Setup) on a Belkin router. WPS is a feature that simplifies the setup and management of wireless networks. Since some of the old operating systems or computers may not support the WPS feature, only disabling it leaves one with the option.
The methods compiled here are simple and correct until date. However, it is still advised that these should be followed carefully to avoid bumping into problems. It will save your time and money that would indeed be wasted looking for Belkin router support or Belkin support options.
Instructions:
Before beginning, make sure that you have a wired connection through the Ethernet cable to your computer. A wired connection is required to access your router’s configuration page through the IP address. Besides, grab your login details like username & password to login into the router.
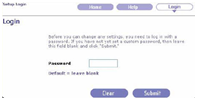
Open your internet browser and type ‘192.168.2.1’ (without quotes and as is) in its address bar. Hit the Enter key on the keyboard to proceed. You will see the Router Setup Utility login page. Click on the Login button on the extreme top right hand corner.
When prompted, enter the admin password and then hit the Submit button. If you never set up a custom password for your router, then leave the box blank and simply hit Submit. It is because most of the Belkin wireless routers are shipped without any password. Thus, the field is generally left blank until a new password has already been set up.
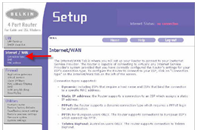
When logged in to the router, click on the Wireless link, the heading in the left hand pane. It will display different sort of information like Language, Version Info, and Internet Settings etc. in the right hand pane.
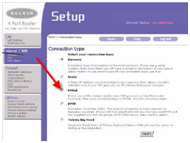
Click on the Wi-Fi Protected Setup link under Wireless and you will see the already selected frequency of your wireless connection like 2.4 or 5G etc. Click on the dropdown menu next to the Wi-Fi Protected Setup (WPS) option and select Disabled.
Click on the Apply Changes button to save the changes to the router. Exit the router’s interface if you aren’t making further changes to the settings. You can also verify the WPS disabling with its light. The light over the WPS button but under the Router Status Light must go off after the setting has been done.