Showing posts with label netgear wireless router. Show all posts

Monday, August 13, 2012

Setting Up a Netgear Wi-Fi Router

Netgear wireless router being one of the most popular wireless devices allows you to interconnect your PCs, laptops, peripheral devices, and several other devices etc. via wireless or home networking. It means you can share multiple media files or documents, do live streaming, browse the Internet, send/receive emails, or print documents etc. simultaneously. Check the given below steps and set up your Netgear wireless router.
Setting Up a Netgear Wi-Fi Router

Smart Wizard Installation Assistant Setup Method
Below steps will help you automatically perform Netgear router setup: 
  • Insert the ‘resource CD’ into your PC and wait for the response. The CD will auto-start itself and recognize your PC’s language viz. English or French etc. click on ‘Yes’ or ‘Ok’ to continue in the same language or change it if you want to.
  • Click ‘Next’ to proceed 
  • Click ‘setup’ to launch the Smart Installation Assistant  
  •  Follow rest of the instructions and the wizard would check your Internet connection, configure wireless network settings, and choose the optimum security level for your network.
Manual Setup Method
Below are the easy steps that will help you access Netgear router setup: 
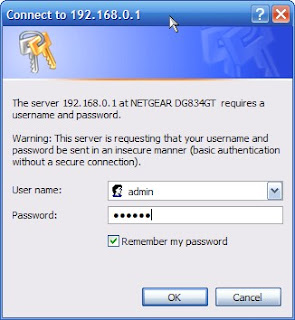
  • Open your web browser. 
  • Type 192.168.0.1 or 192.168.1.1 in the address bar and hit ‘Enter’ on the keyboard. You will see a login screen. 
  • On the Login screen, enter your username and password. If it’s a new router, then the login information would the default one that came along with the router. If it’s an old router, then the information would be the configuration information that you entered while setting it up for the first time.
  • After logging in, you will see a Router Setup utility window. Follow the on-screen prompts and set up and configure your Netgear wireless router.
Once you have set up your router, you can use it for wireless or home networking, access point setup, wireless switch setup, or Firewall configuration etc.
***You can also find here support for Netgear router problems. Check here how to add Kindle Fire to your Netgear wireless router.

***You can also find here how to fix 'Common Netgear wireless router problems'.

Tuesday, July 31, 2012

How to Disable Inbuilt Firewall in a Netgear Wireless Router

Your Netgear wireless router comes with great features and utilities. A built-in firewall is one of them. Disabling the firewall in your Netgear wireless router can’t be a very good idea as it protects your computer data, home network, and Wi-Fi bandwidth from unauthorized users and dangerous hackers. However, you may still want to deactivate it for using certain applications such as port forwarding or adding a gaming console etc.

Understand Your Router?

Your Netgear router doesn’t have an ‘On’ or ‘Off’ button that allows you to disable the firewall. Infect, no wireless router in the world has such button or feature that deactivates the firewall. You will have to login to your router’s admin window to modify the settings. Below are the easy steps that will help you change the firewall rules.

How to Guide:

1.    Open your web browser viz. Internet Explorer, Chrome, or Firefox etc.
2.    Type ‘192.168.0.1’ or ‘198.168.1.1’ (without quotes) in the address bar and hit ‘Enter’ on the keyboard.
3.    When on the login screen, key in your username and password that you entered while initially setting up your Netgear wireless router and click the 'Login’ button or hit the ‘Enter’ key.
4.    If you never changed your original username and password, then these must be ‘admin’ and ‘password' respectively. However, you do check your router credentials before putting in anything.
5.    In the left hand side menu, click ‘Services’, and then click ‘Firewall Rules’.
6.    Under the ‘Inbound Services’ category, click the ‘Add’ button.
7.    Click on ‘Any’ under the ‘Service Name’ list and select ‘Allow Always’ from under the ‘Action’ list.
8.    Click ‘Apply’ to activate the newly setup rule. Move your newly setup rule upward until it sets as the first rule under the ‘Inbound Services’ section.
9.    Click the new rule under the ‘Enable’ column to enable it finally. Now your firewall is disabled and your internal network is fully open to virus attacks.
10. You can enter the same rules under the ‘Outbound Services’ category using the same settings. Finally click the Enable’ column to ensure that your firewall rules are set up for outbound network also.
***You can also find here support for Netgear wireless router problems. Also check out here how to add Kindle Fire to your Netgear Wireless Router

Tuesday, July 24, 2012

How to Secure your Netgear Wireless Router

How often have you called your tech-savvy neighbor home and have him fixed your wireless router issues? Several times, Right! Did you ever try to think that he while fixing your problem might be infiltrating with your wireless security settings and exposing your wireless connection to unauthorized access? I guess, you have never checked on your friend or neighbor like that before.
How to Secure your Netgear Wireless Router
Or, in a different case, you might have an unprotected wireless connection on which your neighbors or colleagues are logging in and taking account of everything that you do on the Internet or stealing bandwidth etc. This might be scary but it is true.
You must password protect your wireless router if you want to save your confidential information and prevent it from unauthorized access. Such people can ruin your life temporarily or forever by taking advantage of your insecure wireless connection. You may not believe my words but it did happen to a BUFFALO, New York-based homeowner who became prey to his young neighbor’s malicious, stealth modus-operandi (read this:http://www.pjstar.com/free/x1923755260/Buffalo-child-porn-case-shows-Wi-Fi-privacy-dangers. So do not let some one take advantage of your wireless network and router. Check these steps and secure your Netgear wireless router.
1. Connect your PC to the Netgear device using an Ethernet cable. Plug the cable’s one end into the back of PC’s Ethernet port and the other end into any one of the 4 LAN ports at the back of the router.
2. Ensure that all the lights are lit on the router, if any of the lights is not lit then recheck the wire and connection.
3. Open your Internet browser viz. Internet Explorer, FireFox etc.
4. Type ‘http://192.168.0.1’ (without quotes) in the address bar of your Internet browser and hit ‘Enter’. You can also use ‘http://192.168.1.1’ (without quotes) to open the router login page.
5. When the login page comes up, type your username and password that had come with your router credentials. 
6. From the left hand side panel, under the ‘Setup’ category, click ‘Wireless Settings
7. In the ‘Wireless Network’ section, type whatever name you want to give to your wireless network in the first box that says ‘Name (SSID):
8. In the ‘Security Options’ section, click on the last option ‘WPA-PSK [TKIP] + WPA2-PSK [AES]
9. Under the ‘Security Options (WPA-PSK + WPA2-PSK)’ section below, type in your desired wireless network key in the box that says ‘Passphrase ……. (8-63 characters or 64 hex digits)’.
10. Before clicking the ‘Apply’ button, note down the network name, key, and security option on a piece of paper or on a notepad in your computer as you would require these details to connect to your wireless network.
11. Click ‘Apply’ and exit the window.
***If there is a modem connected between your PC and router, disconnect it from the computer by unplugging the Ethernet cable from the back of modem and computer both. Now, reconnect the computer and router by following the first point at the top.

Wednesday, July 18, 2012

How to Boost the Range and Signal Strength on a Netgear Wireless Router

How to Boost the Range and Signal Strength on a Netgear Wireless Router
Netgear wireless devices are known to woo users for their networking and wireless capabilities, outstanding Wi-Fi range as well as excellent signal strength. That said, Netgear devices are one of the best choices for going wireless.
However, these devices are equally known to pose challenges like poor Wi-Fi signal strength, range, and intermittent connection among other Netgear router problems at times. Don’t worry! I'll discuss some great tips for your Netgear wireless router to help you fine tune it for the optimal results. You can save tremendous time using these tips and happily go wireless.
1. Positioning – It plays an extremely important role in having a good wireless range. Choose a location that is free of obstacles, electrical equipment like microwave ovens, fax machines, mobile phones, and computers etc. You can choose to place the router in the centre of a room or home for even and omni-directional range. You can also mount it on a wall that is empty of electrical, phone wires or metal objects as well as those mentioned above.

2. Point the antennas (of your Netgear router) upward in line as well as view of one another. If your router came without antennas, then buy one or two as per your choice from a third-party manufacturer.
If you are using an external antenna, then it is recommended to place it high as well as away from physical touch with equipment and obstructions etc. If there is a multistory building, then position it at least 45 degrees (or more) high from the ground.
3. Attach an Antenna – As said earlier, you can buy and attach an external antenna to your device in order to enhance the signal strength & range. Follow the instructions mentioned in the above step for the right positioning of the antenna.
4. Choose a strong channel – There are total of 11 channels (13 in Europe) for 802.11g and 802.11b wireless router versions. You can select any one of them for your Netgear device. 802.11g and 802.11b protocols just have three non-overlapping channels. Choose the channel number, which is not being used by anyone else in your neighborhood. Though it is practically impossible, but still options are there.
5. Attach a Powerline Extender – Buy a powerline extender from Netgear (it does offer these little, powerful gadgets) and plug it directly into your router with another end into a power outlet. The extender doesn’t require configuration and is low priced. It simply uses a power line to transmit signals instead of an Ethernet cable.
6. Upgrade Equipment – If your router is an old genius, then it is better to upgrade it. Old devices are prone to transmitting weak signals and thus making your wireless connection perform real slow and sluggish. Thus upgrade your Netgear device to a newer version. You can also visit Netgear’s official website for upgrade options and help.
***RangeMax products of Netgear come with multiple antennas and hence usually don’t pose such problems. Advanced users can also choose to setup their Netgear device as an access point, use a repeater, or site survey etc.

Wednesday, March 7, 2012

How to Configure NetGear DG834G


netgear routerA NetGear DG834G is a wireless router able to create a wireless network with 54 megabytes transfer speeds and transfer speeds depends on your internet connection.If you want to personalize your NetGear DG834G then you have to enter its configuration utility. You can configure your netgear router via web browser when it will connect to the network.Following steps help you to configure your netgear DG834G router.
 If you want to diagnose and resolve connection issues in Netgear wireless router then follow this article which will help you to resolve your netgear connection.Steps to Diagnose Connection Problems in Netgear Wireless Router.

Step1: If you want to configure your router then open your web browser.

Step2: Type the address "192.168.0.1" into the address bar and hit "Enter" to load your Netgear wireless router setup manual. Log in with the default user name "Admin" and the default password "Password."

Step3: Click the "Wireless Settings" link on the left side of your page and you can also see the various settings relating to the wireless network where your router is creating .From this window you can change the network name, encryption type and password.

Step4: From "Maintenance" section on the left side of the page to check various maintenance related settings for your router. You can also check current router status, what devices are connected, what devices are blocked and you can select backup your current settings.

Step5: After completing the all above steps click on the save button before exiting the Netgear wireless router setup utility to save all of your changes. You should click the on save button otherwise it will go back into previous configuration.
You should periodically check for an upgrade to your Netgear router.Upgrading your router can add new features that improve the security and performance .If you want to upgrade your netgear router,follow this blog .How to Upgrade a Netgear Router, which i have discussed in same blog.

If you find difficulties to perform the task, consult an expert for solve the problem and reach online technical support service desk of V tech-squad at their Toll Free No +1-877-452-9201.

Thursday, November 17, 2011

How to Upgrade a Netgear Router

A Wireless router is a device that performs the functions of a wireless access point and a network switch joining your computer and your high-speed modem and as a wireless access point that allows your wireless devices, such as a laptop.  They are commonly uses to allow access to the Internet or a computer network without the need for a cabled connection. You should periodically check for an upgrade to your Netgear router. Upgrading your router can add new features that improve the security and performance of the device as well as addressing any problems not originally detected during manufacturing. Netgear allows you to check for an upgrade from within the SmartWizard interface. You can access the SmartWizard using your web browser. The methods described here are simple and correct to the date. It is, however, recommended that these should be followed carefully to avoid encountering problems. You can also contact Netgear router Support at their Toll Free 1-877-242-9701 for help and support.

Steps to Upgrade Netgear router

•    Open your web browser and type "routerlogin.net" in the address bar and press "Enter."

•    Type the user name and password for the Netgear router into the login dialog. The default user name for your Netgear router is "admin" and "password" is the default password. Click the "OK".

•    Locate the "Maintenance" area on the left side, and click the "Router Upgrade" link.

•    Click the "Check" button. This automatically connects you to the Netgear support servers and checks to see if a newer version of the router software is available. If an upgrade is available, you are asked to download the file onto your computer. By default, the file is saved in the "Downloads" folder.

•    Minimize the Netgear SmartWizard page, and navigate to the downloaded file. Right-click the file and click "Extract here."

•    Maximize the Netgear SmartWizard page, and click the "Browse..." button. This opens a "Choose File to Upload" window on the screen. Browse to the extracted file, and click the "Open" button. This takes you back to the "Router Upgrade" screen on the Netgear SmartWizard.

•    Click the "Upload" button. This initiates the automated upgrade process. Your router will restart once this process has completed.

Monday, June 27, 2011

How to Access Netgear Wireless Router Settings

Netgear wireless router being one of the most popular wireless networking devices allows you to interconnect your computers, laptops, peripheral devices, and non-computer devices etc. Netgear wireless router settings must be changed using the router's web-based interface. Any computer on the network can be used to access it. There are a few different variations of login credentials. Though these steps will use the details that work for the most common router models, the alternate login details that other models of Netgear wireless routers use will also be included.

Below are the easy steps that will help you access or modify your

1. Open web browser, in the address bar, type "192.168.0.1" press enter. This will bring up the login prompt. If that doesn't work, try "www.routerlogin.net", "192.168.0.5", or "10.1.10.1".

2 . Enter the username "admin", and the password "password" in the appropriate fields, then click OK to login. If that password fails, try "1234," "Password" or "admin" until you are greeted with the settings screen.

3. Make any required changes to the settings. Under security, it is possible to specify a new username and password for added security. Once you are done, close the window, and the system will automatically log you out.

Popular Posts