Thursday, June 30, 2011

How to reset a LinkSys Router password

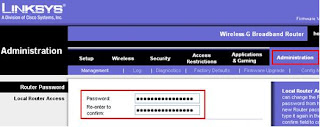
LinkSys Router is a very popular router among the home user manufactured by Cisco. These may be wireless routers, DSL routers, and cable routers. If you have forgotten your LinkSys wireless router password, the best thing to do is to reset your Linksys Router. If you don't know or forgot the password this blog will show you how to reset the password.

1. To restore the Linksys router configuration to factory defaults, hold the reset button on the unit for 30 seconds.

2. Once your router is hard reset, you will need to login and reconfigure it again. To reconfigure your LinkSys Router, connect a computer to one of it's Ethernet ports, open a web browser, and type http://192.168.1.1/. This will take you to a popup box which asks you to enter a username and password to login to your router. On older LinkSys routers, the default username is blank and the default password is "admin." On newer Linksys routers, both the default username and the default password are set to "admin."

3. Once you are past the login screen, you are able to reconfigure the LinkSys router.
4. After changing the administrator password then you will need to enable WEP or WAP security.

Wednesday, June 29, 2011

How to Install any D-Link Wireless Router

Nowadays, many people go for a wireless router over wired networks as it allows Internet accessibility minus the presence of the wires and cables. There are many manufacturers that have produced their own versions. But probably one of the most popular brands today is the D-Link wireless router. D-Link routers have a straightforward installation process, despite the advanced technology behind wireless equipment. So there is no reason to wait around for a technician to help you install your wireless equipment.

Steps to Install D-Link Wireless Router

1. Remove the cable that is attached to the "Internet" port on the rear of your DSL or cable modem.

2. Plug the Ethernet cable into the "Internet" port on the modem and plug the other end of the cable into the "Internet" port on the rear of the D-Link router. Attach the power adapter to the port on the rear of the router and plug the adapter's cord into a outlet.

3. Remove the power cord from your modem and wait 10 seconds before plugging it back in. This will reinitialize your modem and force it to establish a connection to the D-Link router. Your router will immediately begin distributing a wireless network with the "D-Link" network name.

4. Connect your computer to one of Ethernet ports on the rear of the router and open a Web browser. Type "http://192.168.0.1" into the address bar and press "Enter." Enter "admin" into the username field and type "admin" again into the password field. Click "OK" to open the wireless configuration page. Click "Wireless Security Setup Wizard" to create a wireless password for your router's network. Click "Apply" to save the changes to the router's settings.

Monday, June 27, 2011

How to Access Netgear Wireless Router Settings

Netgear wireless router being one of the most popular wireless networking devices allows you to interconnect your computers, laptops, peripheral devices, and non-computer devices etc. Netgear wireless router settings must be changed using the router's web-based interface. Any computer on the network can be used to access it. There are a few different variations of login credentials. Though these steps will use the details that work for the most common router models, the alternate login details that other models of Netgear wireless routers use will also be included.

Below are the easy steps that will help you access or modify your

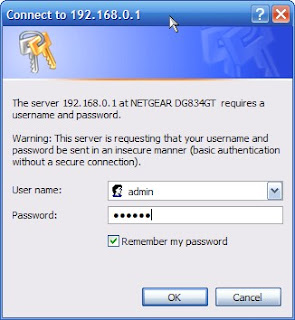
1. Open web browser, in the address bar, type "192.168.0.1" press enter. This will bring up the login prompt. If that doesn't work, try "www.routerlogin.net", "192.168.0.5", or "10.1.10.1".

2 . Enter the username "admin", and the password "password" in the appropriate fields, then click OK to login. If that password fails, try "1234," "Password" or "admin" until you are greeted with the settings screen.

3. Make any required changes to the settings. Under security, it is possible to specify a new username and password for added security. Once you are done, close the window, and the system will automatically log you out.

How to Install Wireless Router

Using a wireless router makes computing life much more enjoyable. Wireless Router helps you connect to the internet and communicate with your other computer without running wires. In this blog we have tried to explain how to install any wireless Router. You can use this information for any wireless router

Steps to Install Wireless Router

1. Shutdown your computer and disconnect your Internet modem. Unplug the ethernet cable from the network adapter on your computer.

2. Take the ethernet cable you disconnected and put it into the wireless router that is marked "Internet".

3. Plug the ethernet cable into the wireless router that is marked "1”.

4. Take the other end of the ethernet cable and plug it right into the computer network adapter.

5. Finally turn the power on the wireless router and start up your computer. Install the CD that came with your router and there you go. You have fully installed your wireless router without any hassle.

Friday, June 24, 2011

How to Secure Your Wireless Router

When you purchase a wireless router it is not secure and its default configuration will allow unwanted users that are in a neighboring building or sitting in a car that's parked outside your apartment. It will increase your monthly Internet bill especially when you have to pay per byte of data transfer. They could also gain access to your Computer and steal data from your system. Manufacturers leave the configuration "open" so that the user can easily set up the wireless router and get it up and running quickly. However, there is a risk if the wireless router is not secure. The good news is that it is not very hard to make your wireless router Secure, which will both prevent others from stealing your internet and will also prevent hackers from taking control of your computers through your own wireless router.
Steps to make your wireless router Secure

1. Open a web browser and type either: http://192.168.1.1 or http://192.168.2.1

2. Change the Admin password, Most wireless routers ship with a blank password. It is essential that this is changed else a potential hacker could get into your router configuration and lock you out of your own hardware.

3. Change the network name. The default network name is usually made up of the name/model of your wireless router.

4. Enabling Encryption:- This is switched off by default. There is a choice of WEP, WPA and WPA2. Currently the latest encryption method is WPA2 so use this where possible. Both your wireless router and wireless PC adaptor must be configured to use the same encryption.

5. Update router firmware:-It is recommended that the latest router firmware is downloaded from the manufacturer's website and installed in the router. This will hopefully fix any bugs that have been found for your router and also help with any known security flaws in the router itself.

6. Backup settings:- Finally, backup all router settings. If you reset the router back to its factory default settings for whatever reason, your configuration can later be easily and quickly restored back into the router.

Thursday, June 23, 2011

How to Set Up Remote Desktop Router


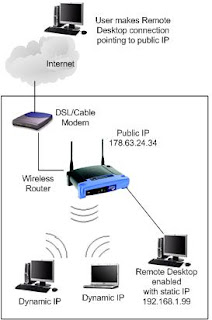
For accessing your computer from outside the network you should configuring your Wireless router for remote. If you are thinking to connect your remote desktop machine from the Internet, you need to configure the wireless router to allow traffic to the PC. Linksys router is a common router used on home networks for wireless and LAN configurations. Configuring your router to allow port forwarding to a remote desktop only takes a few steps through the graphical user interface. This blog states on how to setup Remote desktop router.

Steps to Set Up Remote Desktop Router

1. Open your browser and type the IP address of the router in your address bar. This opens a window for the username and password needed for access to configure the router. Click the "Applications and Gaming" tab on the opening screen. This opens a window with a list of ports of which you can open for access on your network.

2. Type "Remote Desktop" in the application textbox. Enter "3389" in the "Start" and "Stop" port ranges. This port number is specific to the remote desktop application

3. Leave the value of "Both" in the protocol listbox. Type the IP address of the internal machine on your network. The IP address is the machine running remote desktop. When traffic from the Internet reaches the router, it forwards the request to this IP address. Check the "Enabled" checkbox and click "Save Settings."

Wednesday, June 22, 2011

How to Configure a Netgear Firewall

Wireless routers are quickly becoming an important device. Wireless routers help you connect several computers simultaneously to the internet in one go and that too, wirelessly. A common setting for a network router is firewall configurations. A firewall blocks unauthorized access from the internet to the internal network. The Netgear firewall also allows access to the internal network using port forwarding. This blog states on how to configure a Netgear firewall

Instructions

1. Open web browser, In the address bar enter the IP address for your router. The default IP address for new Netgear routers is "192.168.0.1." Enter your administration password when prompted.

2. Click the "Security" link on the left side of the screen and then click "Services." A new window opens with your current firewall settings. Click the button labeled "Add Custom Service."

3. Enter a name for the new firewall setting. In the drop-down box labeled "Type," select "Any."

4 . Enter a starting and ending port number in the text boxes labeled "Start" and "End." For instance, if this is for website traffic, the start and ending port is 80.

5 . Click the "Apply" button to save your changes. The router's firewall settings are configured for your new service.

Friday, June 17, 2011

How to Backup Files in Windows Vista

Windows Vista's Backup and Restore Center creates backups to CDs and other media. File backups are an important safeguard against losing your data to hardware failures or software malfunctions. Microsoft windows vista has increased its backup and recovery capabilities from previous leased Microsoft Windows XP. Microsoft Windows Vista offers a new “Backup and Restore Center” that has many back up options.

Note:- I do not recommend you doing this unless you are comfortable editing the Windows Settings. I will not responsible for any damage that may be caused to your PC after editing the settings by following the steps below. You proceed at your own risk or may take help from online technical support technician at their Toll Free No. +1-877-452-9201

Below are the steps to backup your file

• Select Start, and then type Backup into the search field or Go to Control Panel from the Start menu.
• Click on System and Maintenance, then Backup and Restore Center.
• Click Back up your computer.
• Choose a backup location. Click Back up files. To backup to local media, select hard disk, CD, or DVD and click Next.
• Select the files to backup.

Note:- By default, Vista provides a set of pre-selected file types, such as pictures, music and videos. To choose unlisted file types, select "Additional Files."Click "Next." Note that only files that are on NTFS-formatted partitions can be backed up. System, executable and temporary files are not options.

• Establish a backup schedule. Vista can automatically back up the selected files daily, weekly, or monthly. Select how often to backup your files, and the day and time for each backup.
Note:- Scheduled backups are not available on Vista Standard and Home Basic.